I’ve really suffered a lot to have the Miccrosoft NDES (aka SCEP) environment deployed in a perfect state, and thought to share with you this (too) detailed step-by-step implementation guide.
Important Note: for all testing please use Google Chrome ( or any other web browser) and avoid using Microsoft Edge. I’ve wasted many hours treoubleshoting authentication issues and it was caused by Edge
This guide is available in downloadable PDF file at the end of this page.
Also, a step-by-step video is available
Introduction
This guide contains all the necessary steps to deploy a stable SCEP environment regardless of the used MDM solutions. The information were gathered from several references covered in the final section.
Content at a glance
- Prerequisites
- Model architecture
- Certificate Authority preparation
- NDES role deployment
- NDES HA
- Azure AD Application Proxy
- Accessing SCEP
- Important Notes
- Troubleshooting
- Resources
| Step | Requirement(s) | Description/Notes |
| 1 | SCEP ECO System | ADDS, ADCS, NDES server(s), AzureAD App Proxy. In case a different reverse proxy is used, refer to the vendor documentation |
| 2 | AD Certificate Services | the environment must have a healthy AD PKI environment (AD Root CA, and subordinate CA (if any) |
| 3 | NDES Server | NDES (or Network Device Enrollment Services) is the core of the SCEP environment. At least one Windows server machine with NDES role installed is required. For NDES HA please refer to the relevant section |
| 4 | Azure AD App Proxy | It’s a secure cloud-based service to publish on-prem applications to the internet. At least two server VMs for the app-proxy-connector are required for HA |
| 5 | VM Sizing | Please refer to the product documentation for proper VM sizing information |
| 6 | AD Enterprise Admin privileges | NDES role is part of the ADCS services, a user account with Enterprise-Admin rights to the forest/domain is required |
| 7 | Enterprise PKI health status | It’s highly recommended before the implementation is kicked off to check the status of the PKI environment. Run pkiview.msc from a CA server to check the status of core PKI certificates and CRL lists |
| 8 | SCEP/NDES service account | NDES service requires an AD service account to be created. A very strong password should be created for that account since it will be used for authentication over the internet |
| 9 | [Optional] SA security group | Create AD group for the service account user(s) as a best practice to grant the required permissions to a group in case more SAs are added in the future |
| 10 | [Optional] AD security group for NDES computer objects | Similar to the idea explained in point #9 |
| 11 | OS firewall and IE Enhanced Security | Disable the local Windows firewall for the SCEP machines (NDES and Connectors), as well as the IE Enhanced Security feature |
| 12 | Networking Requirements | – If the implementation is on a cloud service, such as Azure, make sure a direct connection is configured between the cloud and on-prem. ExpressRoute or Site-to-Site VPN – Disable all OS firewalls unless required – Allow basic traffic for the newly deployed VMs, such as AD, DNS, NTP, Internet – NDES servers must connect to PKI (Root CA or subordinate CA) over ports 80 and 443 TCP – Azure proxy connector server(s) must connect to NDES node(s) over 80 and 443 – Azure proxy connector server(s) must have an internet connection and make sure that the outbound SSL inspection is properly configured or disabled on the perimeter firewalls (if any) – RDP from on-prem to SCEP machines |
| 13 | Monitoring and other | – Configure OS monitoring – Anti-virus and anti-malware – Backup and DR |
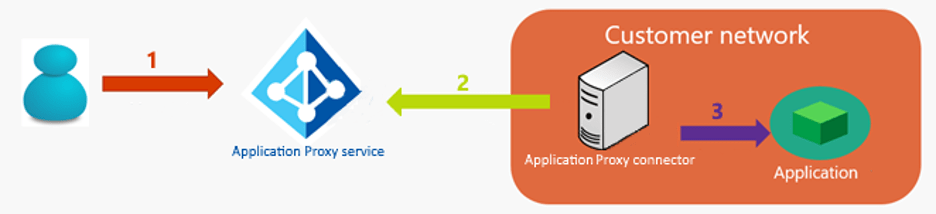
Architecture diagrams by Microsoft about SCEP


Certificate Authority preparation
| # | Step | Details & Description |
| 1 | Login to the CA server | |
| 2 | Create SCEP certificate templates – end-device template | 1- End-user enrolling certificate template 2- Run CS console or “certsrv.msc” 3- Right-click Certificate Templates >> Manage 4- Select User template > right-click > duplicate 5- Mentioned here what should be changed, other options are left on defaults 6- The new template window opens. Select General tab > set a friendly name, “NDESUser” for example 7- On the same tab, set the validity period of the certificate 8- Compatibility tab > set the compatibility to Windows Server 2016, and Windows 10/2016. 9- Cryptography tab, make sure the key-length is set to 2048 10- Extensions tab > select Application Policies > click Edit > Click Add > select Any Purpose >Ok > Ok 11- Security tab > add the service account user (or group), then assign “Read” and “Enroll” rights 12- Subject Name tab > select Supply in the Request 13- Click Apply and Ok to save the new template |
| 3 | Create SCEP certificate templates – NDES IIS Web site cert template | 1- End-user enrolling certificate template 2- Run CS console or “certsrv.msc” 3- Right-click Certificate Templates >> Manage 4- Select Web Server template > right-click > Duplicate 5- The mentioned points must be changed, unmentioned options are left to defaults 6- The new template window opens. Select General tab > set a friendly name, “NDESServer” for example 7- On the same tab, make sure to UNCHECK “Publish in Active Directory” 8- Security tab > add the computer object (or the security group) of the NDES server (assuming the server has been deployed and joined to domain), then assign it “Read” and “Enroll” access rights 9- The template is ready to be saved, click Apply then Ok |
| 4 | Publish the new cert templates | On the CA server 1- Close the current template window and get back to the CA console, if it’s closed, reopen it by running “certsrv.msc” 2- Select Certificate Templates > right-click > New > Certificate Template To Issue 3- Another window will open, select both newly created templates and click OK |
| 5 | Grant access rights for the service account to the CA server | 1- In the CA console, right click on the CA server node in the left pane > then click on Properties 2- Select the Security tab, then add the service account user (or the AD group, if any) 3- Grant it Request Certificates and issue and manage certs 4- Click Ok once finished |
| 6 | NDES RA certificates access rights | NDES server is part of the enterprise CA PKI system, and it requires couple of certificates to be authorized to requests certificates for the end-users. NDES server computer object requires access rights to a couple of cert templates. Follow these steps: 1- End-user enrolling certificate template 2- Run CS console or “certsrv.msc” 3- Right-click Certificate Templates >> Manage 4- Apply the following steps to the following templates: a- CEP Encryption b- Exchange Enrollment Agent (Offline request) 5- Double click each of the mentioned cert templates in step 4, and go to the Security tab 6- Add both the NDES service account and the computer object of the NDES server (or preferably add the AD security groups for both) > assign them Enroll and Read access rights 7- Apply and Ok |
| # | Step | Details & Description |
| 1 | Server readiness | Deploy 1 Windows server VM, at least Windows server 2016, preferably 2019. Prepare it according to the prerequisites section. A C: drive is quite enough with enough disk space as per Microsoft’s requirements. No specific requirements. CPU and memory are important, at least 4 CPU cores and 16GB of RAM |
| 2 | Networking | Make sure to allow the necessary ports as mentioned in the prerequisites section |
| 3 | NDES role installation For Screenshots view this guide | Follow the steps in this guide from Microsoft, and skip the Service Account Delegation section. The rest steps will be detailed here under https://learn.microsoft.com/en-us/windows/security/identity-protection/hello-for-business/hello-hybrid-aadj-sso-cert#install-the-network-device-enrollment-services-role |
| 4 | RA Information | Define a unique RA name when you get to that step. RA stands for Registration Authority, the NDES server requires generating two certificates since it’s a part of the PKI environment |
| 5 | NDES Service Account privileges on the NDES server | Assuming that you’ve followed the steps in step #3, please make sure you do the following locally on NDES server: Add the SA to the local IIS_IUSERS users’ groupCreate SPN for the SA accountRun > gpedit.msc > follow this guide |
| 6 | Generate SSL certificate for IIS | 1- For NDES IIS security, a certificate is required to make the web page secure. a- Run > mmc > File > add/remove Snap-inSelect Certificates > add > Computer Account b- Personal > Certificates > right-click > All Tasks > Request New Certificate c- Select “NDESServer“, then on the link “More information is needed…” d- Subject tab, select “Common Name“, and add the FQDN of the NDES node, then click Add e- Another common name, add the NetBIOS name of the node f- Alternative Name > DNS > FQDN once again, click add g- Set a friendly name for the certificate, hit General tab, and set a name. could be called “NDES web server cert” |
| 7 | Bind the SSL cert in IIS | Bind the certificate with the website. Go to IISFYI, the configuration is a virtual application for MSCEPRight-click the Default Web Site > Edit Bindings > Add >> select the SSL cert was created. Save |
| 8 | Modify MSCEP Registry Keys for the NDES cert templates | By default, the NDES service will be pointing to the IPSec, but since we’ve created dedicated template for end users (NDESUser), NDES should be pointed to it. Follow these steps: 1- Run > “regedit.msc” > navigate to [HKEY_LOCAL_MACHINE\SOFTWARE\Microsoft\Cryptography\MSCEP\] 2- Modify all IPSec values and set it to NDESUser |
| 9 | Create Reg Keys for Max URL Length | [optional, but preferred] 1- Run > “regedit.msc” > navigate to [HKEY_LOCAL_MACHINE\SYSTEM\CurrentControlSet\Services\HTTP\Parameters] 2- Create the following DWARD values: a- MaxFieldLength b- MaxRequestBytes 3- Set the value of each to 65534, decimal |
| 10 | Increase the max value of the challenge password’s cache | The default value for the cache is 5 passwords, you’d need to have that value set at least to 50% of the devices that will access SCEP. You need to create a PasswordMax registry key. Find the steps here: https://www.ibm.com/docs/en/maas360?topic=integration-increasing-password-cache-limit-ndes-server#:~:text=than%20five%20passwords.-,Procedure,-Log%20on%20to Don’t forget to restart IIS after perorming this change, or reboot the server |
| 11 | Reboot the server | SCEP will be tested right after rebooting the server |
| 12 | Test SCEP/NDES | In a web browser, run the following URLs: 1- http://localhost/certsrv/mscep/mscep.dll 2- http://localhost/certsrv/mscep_admin if both pages open with no issues this means the setup Is successful. However, verify the following points a- Try both URLs in HTTPS b- For URL #2, make sure that you get no access rights warnings, you should see the service thumbprint, as well as the challenge password c- Try to open both URLs, but with the FQDN instead of “localhost” d- You should be prompted for credentials if you access URL#2 with the FQDN, try to login with the SA account, if it succeeds then your setup is fine, but if not; go to the next point e- If no problems are experienced, your setup is successful |
| 13 | [OPTIONAL] Service Account is unable to loginto MSCEP_ADMIN page | In case you are facing a problem logging into MSCEP_ADMIN page with the SA account, follow the guide. 1- Open IIS config console 2- Expand Sites and select Default Web Site 3- Double click the icon Handler Mappings 4- From the right pane, click on View Ordered List 5- Locate the entry StaticFile and make sure it’s moved above ExtentionlessUrlHandler-ISAPI entries. Use the “Move Up” action from the right pane to change the position. It should be listed before any of the mentioned Extension entries 6- From the left pane, click on Application PoolsSelect SCEP from the app list, double click it 7- Change the Managed Pipeline Mode to Integrated 8- Click Ok 9- Now, try again to login with the SA account. It should work Reference guide https://www.gradenegger.eu/?p=145 |
| 14 | Validate Config | This step is optional, but highly recommended. Run the NDES Implementation PS script on the NDES node to validate the entire setup. Find the script syntax on Confluence under name Validate-NDESConfiguration.ps1 Note, in case the service account and the computer object are in AD user groups, you can ignore any errors generated by the script regarding both having insufficient access rights to NDES environment |
| 15 | Test Cert Enrollment | This step is optional, but highly recommended. This tool is very useful to simulate end-point devices. However, it supports HTTP only, so initially you can run it on the NDES server. Download link and instructions are here: (with the NDES FQDN, not the AppProxy’s URL) https://xdot509.blog/2020/10/16/ndes-test-tool/ http://secadmins.com/index.php/ndes-scep-windows-test-tool/ |
Watch this video for more information about configuring NDES in a highly-available setup,
| # | Step | Details & Description |
| 1 | Connector VMs | As a best practice: 1- Deploy at least two connector VMs for HA purposes 2- Size and plan the number of required VMs and their hardware spaces based on the business needs. Find more about sizing here and also carefully read this page for further instructions, click here 3- The VMs shouldn’t be joined to AD domain unless necessary 4- As a best practice, the connectors should be placed near to the application servers, NDES servers in this case, to avoid any networking latency issues. In this guide, the VMs are also placed on Azure in the same subnet as the NDES nodes 5- Make sure the VMs are prepared for the connector installation as per this guide here |
| 2 | Configure the connector | 1- After preparing the VMs, login to Azure portal. A user account with AzureAD Global Admin or AzureAD Application admin access rights is required 2- Go to AzureAD 3- on the left pane, under Manage section, click on Application Proxy 4- from the buttons bar, click on Download Connector Service. So basically this will download the connector installation file. You can download it on your computer and then pass it to the connector node, or just login to Azure from the connector server. The latter is easier especially if the machine is not joined to the domain 5- Run the installer. It will prompt you to login, use privileged Azure credentials as mentioned above. The credentials are only required once and then the authentication will be certificate-based, not useraccount-based 6- Once done, the server will be registered in the app proxy console, get back to the app proxy on Azure portal, and you should find the registered connector server 7- Either leave it in the Default connector group, or preferably create a custom group and add the connector to it 8- Repeat the same steps with other connector nodes 9- Validate that all connector nodes can reach the NDES pages via their web browsers 10- IMPORTANT, if the connector nodes aren’t domain-joined, you MUST import your PKI root and subordinate (if any) certificates into the local certs store of each connector node, otherwise NDES pages will be ranked “insecure” in their web browsers, and this will BLOCK the Azure app proxy from serving the SCEP environment Azure App Proxy leverages connector groups for HA, load-balancing traffic across connectors, and pushing connector updates |
| 3 | Configure App Proxy | Now, it’s the time to publish the internal application, NDES in this case 1- Follow the previous steps from 1 to 3 2- From the buttons bar, click on Configure an app 3- On the “Add your own on-premises application”, fill in a meaningful name for the app 4- Internal URL, add the internal URL of the NDES server, it should be like this “https://NDESFQDN 5- External URL, define the external URL that the end-point devices will use for certificates enrollment. Select a custom domain name if required 6- If a custom domain name is used, then upload a public SSL certificate of that domain in PFX format. Note, external URL with a custom domain will require a CNAME to be configured to on the public domain registrar to point to the proxy app. The destination URL will be provided on the same page 7- Pre Authentication, set it to Passthrough 8- Connector Group, select the one defined previously (if any) 9- Leave the rest settings to the defaults, and then click Add on the top buttons bar 10- Test the external URL in a browser |
| Cert Enrollment Page | Internal URL https://NDESFQDN/certsrv/mscep/mscep.dll External URL https://APPPROXYURL/certsrv/mscep/mscep.dll |
| Challenge password | Internal URL https://NDESFQDN/certsrv/mscep_admin External URL https://APPPROXYURL/certsrv/mscep_admin |
| # | Note | Description |
| 1 | Changing NDES service account’s password | Whenever you change the SA password, it’s also required to be updated on SCEP virtual app in IIS on the NDES server – Right-click the SCEP app >> Advanced Settings >> locate the Identity Name >> verify the new password |
| 2 | Renew IIS SSL certificate | Make sure to renew the SSL certificate bound to the default website on time to avoid having the NDES web pages being insecure. This can cause the app proxy to stop translating the website, in other words, end-devices won’t get new certificates |
| 3 | RA certificates | Manually renew the NDES RA certificates issued previously using the following cert templates: a- CEP Encryption. b- Exchange Enrollment Agent (Offline request) Steps: https://msendpointmgr.com/2020/06/15/how-to-renew-ndes-service-certificates-for-usage-with-microsoft-intune/#nonexpired Make sure to grant the SA account the necessary access rights to the private key(s) |
| 4 | Import Private PKI SSL chain onto each connector node | Again, don’t forget to import (and always import the renewed) root and subordinate certificates |
This section includes several tools and techniques to help troubleshoot general SCEP problems
| Problem / Tool | Description |
| IIS logs | IIS logs includes useful information regarding different errors, but not all of them |
| CAPI2 event logs | Enable CAPI2 windows events to trace errors related to certification and NDES/SCEP general errors. Click here for more info |
| Validate your PKI (Root CA and subordinates) | use the utility pkiview.msc to validate the status of all PKI core certificates and CRLs |
| Trace certificates issues Golden Utility | This command is very useful to validate certificate chain issues c:\ps>certutil -verify -URLFetch -v ca1.cer replace ca1.cer with the certificate file you need to check |
| Service Account authentication issues | This blog is very useful and helped me to tackle implementation issues https://www.gradenegger.eu/?p=145 |
| Azure App Proxy Connector issues | Windows Events on a connector nodes are quite useful |
| Extra troubleshooting tips | https://gsecse.wordpress.com/2015/10/06/ndes-deployment-and-troubleshooting/ |
| Test certificate enrollment | Simulate cert enrollment with the SSCEP utility https://xdot509.blog/2020/10/16/ndes-test-tool/ http://secadmins.com/index.php/ndes-scep-windows-test-tool/ |
This video covers fixing some of NDES issues, for example, ERTROR 500
- Main guide for SCEP and NDES deployment
- Create SCEP cert profile on the local CA
- Configure Azure app proxy for SCEP and Jamf Pro
- Integrate Azure AD app proxy with NDES
- NDES role installation steps – Microsoft Guide
- Install and Configure NDES
- NDES testing tool:
- JAMF SCEP requirements
- Implement incrementally and test each step
- Monitoring and logging
- JAMF Pro IP Addresses
- JAMF PKI Certs
- Generating and Uploading SSL Chain of Root
- Obtaining CA certs from Microsoft PKI.
Azure AD App Proxy
- Plan Azure AD app proxy deployment
- Understand App Proxy Connectors (requirements and capacity planning)
- Configuring custom domain names.
- Optimize traffic flow
