Since vCenter is a very critical tool your virtualized environment, it deserves to be offered some sort of protection. Starting from vSphere 6.5, vmware has announced a new feature called vCenter High Availability (AKA VCHA) to add higher availability for vCenter server, this service is available in the virtual appliance (VCSA) only. in this guide you will learn how to configure it step by step.
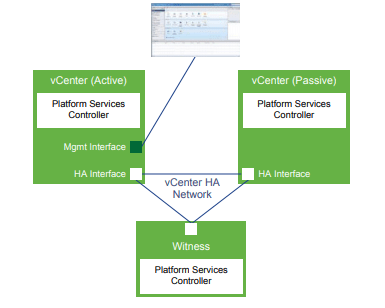
VCHA Architecture
once VCHA is enabled, two more vCenter VMs will be deployed, the original VCSA will be acting as the “Active” node, the second VM will be the “Passive” node, standing-by to take over the vCenter role in case that the main vCenter fails, and the third VM will be playing the “Witness” role, a light-weight vCenter VM, just monitoring both the active and passive nodes. The database is synchronized between the active and the passive nodes.
vCenter HA prerequisites
- vCenter server Virtual Appliance 6.5 edition.
- compute with DRS-enabled and three hosts at least.
- a secondary network subnet/VLAN for vCenter heart beating and database synchronization, VLAN is preffered, but if you are using a flat LAN then another subnet will be fine, in other words, another IP range rather than the vCenter management network range.
- prepare three IP addresses for the heart-beating network to be assigned to the vCenter VMs.
- stand-alone datastores, meaning that the datastores which will be hosting the passive and the witnessnodes must NOT be in a datastore cluster, also make sure that the selected datastores have enough disk space, check the vCenter VM size first to make correct calculations. Place each node in a different datastore for redundancy.
For user guide, precautions, and best-practices guide, preview the following article please:
Things you MUST know first before deploying vCenter HA
Lets get starting
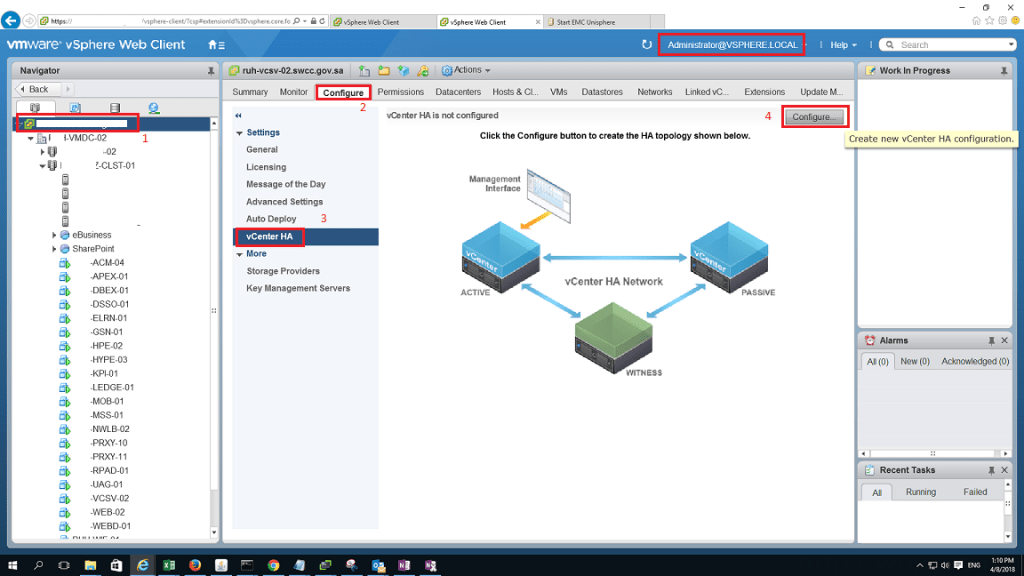
- login as the local admin “administrator@vsphere.local”
- create port group (or distributed port group) for the heart-beating network.
- select the vCenter node from the inventory >> Configure >> vCenter HA >> Configure.

4- Select “Basic” installation if you are using vCenter with embeded PSC.

5- Specify the heart-beating IP for the active node, select the hear-beating network.

6- specify the heart-beating IP addresses for the “passive” and “witness” nodes accordingly.

7- in this page you are asked to select the datastores where the “passive” and “witness” VMs should be placed. You may get a warning messages like these if datastore-cluster is selected. Make sure that you place each VM in a different datastore.


Now, the storage configuration is OK for the passive node, repeat the same steps for the Witness node.

8- review the settings for a final time. The preparation and cloning of the nodes will start once “Finish” button us clicked.


vCenter HA is now ready and healthy. You configure further settings from this screen, like testing failover, suspending, disabling, or even removing VCHA.


And don;tworry about DRS roles, it will be added automatically to separate the vCenter HA vms.

Thanks 🙂
